“What you do, the way you think, makes you beautiful.”-Scott Westerfeld

Monday, June 25, 2012

Makeup of the day! Feeling Inspired ;)

What's on my face today?


Products used (face): 1. I stippled Revlon Colorstay Whipped Foundation in 150 Buff with a Real Techniques Stippling Brush all over face then blended well with a Real Techniques Buffing Brush.
2. Concealed blemishes with the Sonia Kashuk Hidden Agenda Concealer Palette.

For the eyes i'll be using the Revlon Colorstay 16 Hour Eye Shadow Palette in Inspired and one eyeshadow from the Urban Decay Naked Palette:


Products used (eyes):* I always start by filling in my eyebrows using the Coastal Scents Brow Tones palette, a small angled brush and NYX Eyebrow Shaper *
1. Prime the entire eyelid, crease and underneath the brow using NYX Eyeshadow Base in Skin Tone.
2. With a fluffy brush (I used MAC 217) take Naked (matte, soft brown) from the Urban Decay Naked Palette and sweep it through the crease stopping under the highlight area of the brow. This shadow is meant to add depth to the crease while also acting as a transition color.
3. Using a large fluffy brush take the white shimmery shadow (1) from the Revlon palette and apply on the brow bone to highlight. Feel free to blend the crease and highlight shadows softly together.
4. With a flat shadow brush take the green shimmery shadow (3) and pack the shadow on the entire lid. This shadow is not very pigmented so I really had to pack it on! Blend at the crease.
5. Then using a smaller fluffy brush apply the dark blue shadow (4) to the outer corner of the eye taking it up toward the highlight but stopping just before so the Naked shadow is still peeking through. Blend, blend, blend!
6. With the tip of the flat shadow brush pick up the blue shimmery shadow (2) and apply a thin line on the outer 3/4 of the lower lash line. Then with the clean side of the brush, apply (3) to the tear duct/ inner 1/4 of the eye. I also applied (4) to the very outer corner.
7. Line the upper and lower water line with black eyeliner, I used Urban Decay 24/7 Glide On Eye Pencil in Zero.
8. Thinly line the top lash line with Maybelline Master Precise by EYESTUDIO in Black.
9. Curl lashes and apply black mascara, I used ULTA Voluptuous Volume Mascara.
10. *Optional* Then apply false lashes. I normally don't wear falsies but when I do I try to find ones that look as natural as possible. I really like these by Ardell

Products used (cheeks): 1. Using a Duo Fiber brush I applied Hoola by Benefit to the hollows as well as the apples of the cheeks.

Products used (lips): 1. Lightly dab NYX Matte Lipstick in Pale Pink.
2. Top with Smashbox Lipgloss in Baby Pout


“The most beautiful makeup of a woman is passion. But cosmetics are easier to buy.”
― Yves Saint-Laurent


Saturday, June 23, 2012

Makeup of the day

What's on my face today?


Products used (face): 1. I applied Revlon Colorstay Whipped Foundation in 150 Buff with a Real Techniques Stippling Brush and then blended well with the Real Techniques Buffing Brush.
2. Then concealed blemishes with the Sonia Kashuk Hidden Agenda Concealer palette and also a little underneath the eyes with NYX HD Photogenic concealer. Blend well.

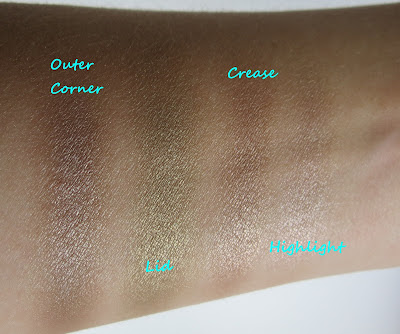
For the eyes ill be using four eyeshaows from the AVON 8-in-1! Eye Palette in Paradise Greens:


Products used (Eyes):* I always start by filling in my eyebrows using the Coastal Scents Brow Tones palette, a small angled brush and NYX Eyebrow Shaper *
1. Using a large fluffy brush apply the highlight shadow to the brow bone.
2. With the same brush apply the crease (shimmery warm brown) shadow to the crease blending lightly toward the brow bone/highlight area.
3. Using a flat shadow brush pack the lid (shimmery green) shadow all over the lid.
4. With a fluffy brush pick up a small amount of crease shadow and blend lid together at the crease.
5. With the clean side of the flat shadow brush, apply outer v (shimmery dark brown) shadow to the outer corner of the eye, intensifying the shadow as desired. Blend, blend, blend!
6. Using a small angled brush apply outer v to the outer half of the lower lash line and lid to the inner half of the lower lash line.
7. With the fluffy brush apply highlight to the tear duct area.
8. Line the lower water line using NYX Jumbo Eye Pencil in Yogurt.
9. Thinly line the upper lash line with ULTA Automatic Eye Liner in Bronze, flicking slightly at the corner.
10. Curl lashes and apply black mascara. I used two mascaras; NYX Pin-Up Tease and Voluminous Million Lashes.


Products used (Cheeks): 1. With a duo fiber stippling brush I apply NYX Matte Bronzer in Light to contour, temples, under the jaw and lightly down the neck.
2. Using the Real Techniques Blush Brush I applied NYX Blush in Rose Garden.
3. To highlight I used a large fan brush to apply a light amount of Prestige Skin Loving Minerals in Pure Shimmer.


Products used (Lips): 1. I used Maybelline ColorSensational in Pink Freeze (805)


“There is nothing more beautiful than seeing a person being themselves. Imagine going through your day being unapologetically you.”
― Steve Maraboli

Thursday, June 21, 2012

Beauty Haul! ULTA, Sally's Beauty and Walmart!

I went shopping throughout the week and wanted to share some new beauty items I purchased!

First up is Sally's Beauty Supply! I absolutely love this store. I always go here mainly to purchase nail supplies. They always have a great deal on China Glaze Nail Polishes, (plus I'm a beauty member which I highly recommend because it really does pay for itself) so as usual I couldn't resist buying some new polishes:


Now I don't know about you, but I find that I'm the type of person that tends to lean towards pink polish so I just couldn't pass up on picking up China Glaze Nail Lacquer in Summer Rain. With that being said, I really wanted to branch out and pick colors I wouldn't normally choose. So my fiancé Jeff was kind enough to help me pick out my current nail polish color China Glaze Nail Lacquer in CHA CHA CHA and another polish I wouldn't usually consider, China Glaze Nail Lacquer in Watermelon Rind. I can't wait until I get to try out all of these polishes :)

Next up is Walmart! One of my favorite beauty products is foundation so I am constantly on the hunt for the best foundation and of course its always better if it can be found at the drug store. While there I stumbled upon these two and I really wanted to give them a try:

Maybelline Instant Age Rewind Eraser Treatment Makeup in the color 130 Buff Beige and Revlon Colorstay Whipped Creme Makeup in the color 150 Buff

I have never tried a foundation from Maybelline so I'm looking forward to giving this one a try and see if I like it. On the other hand, I absolutely LOVE Revlon Colorstay Foundation for Normal/Dry skin so hopefully I'll love this formula just as much.


Lastly, is ULTA! Who doesn't love this store?! Everything I purchased was buy 1 get 1 50% off plus I had my $3.50 off coupon, definitely can't go wrong here!


¤ Nyx- I wanted to try a new eyeshadow primer so I picked up NYX Eyeshadow Base in Skin Tone.
I also wanted to try their bronzer so I picked up NYX Matte Bronzer in Light. I really like this shade, however I was pretty disappointed when I got home and opened it to find it was a little cracked at the top. That's okay though, no biggie!


¤ Maybelline- I finally decided to try the Color Tattoos so I picked up two of them:
Bad to the Bronze and Tough as Taupe.

¤ Revlon- I saw these beauties on a display and I had to have them!
These are the Revlon Colorstay Eyeshadow Quads!

The first one I got is called Decadent with beautiful pink and brown shades:

And this gorgeous quad called Inspired:


So that's it for this Haul. Be on the look out for future makeup of the days and my current nail polish posts where I'll be trying out these products!

Sunday, June 17, 2012

DIY Glitter Heels!

I was going through my closet and saw that I had two pairs of scuffed up heels that weren't being worn due to their condition. I really do love these shoes and couldn't possibly find myself leaving them on the shelf or worse (garbage can). I realized that all they really needed was a little pick-me-up to be able to see the streets again :). So with a few supplies and crafting-mode activated I revamped those old, tired heels into fun Glitter Heels! There are definitely different ways to achieve this look but if you'd like to see how I turned this:

into this:

Then please keep reading :)

First off you'll need a few supplies, like these:


¤ A pair of shoes :p
¤ Glitter! I wanted to use extra fine glitter so I used Martha Stewart glitter from Michaels. I love the different variety of colors.
¤ Glue. I used Elmer's Glue All Multipurpose Glue.
¤ Brushes. I found an inexpensive variety pack of foam brushes also from Michaels.
¤ Bowl. I just used a plastic bowl.
¤ Parchment paper/ Newspaper for easier clean up.
¤ Acrylic Sealer. I used Mod Podge Clear Acrylic Sealer in Gloss that I found at WalMart.
¤ Some sandpaper (if the shoes are patent leather) *not pictured*.
¤ Shaker. I used this to mix different glitters together and for easier distribution.
¤ Time, patience and a little luck.

To start off I would HIGHLY recommend to place newspaper or parchment paper down where ever you are crafting because you'll find the glitter has the tendency to get EVERYWHERE. Can't say I didn't try to warn you :) The shoes I chose are both patent leather so to help ensure that the glitter will stick, take the sandpaper and rough up the material. This should create a rough, scruffy surface like this:

As you can see I took the time to place some parchment paper inside the shoes to help keep the glitter-glue mixture off of the inner material.


Next is to mix the glitter and glue. Take your bowl and mix together approximately 1 Tbsp. of glue with 2 tsp. of glitter. For the sandals I used 1 glitter and for the pumps I used a mixture of 3 glitters. You really need to eyeball the mixture and be the judge of the appropriate glitter to glue ratio. The mixture should be a semi-thick paste like this:

Grab your paintbrush and paint your glittery paste all over the shoe, carefully avoiding any area of the shoe where you don't want glitter! This may take 2 or more coats to completely cover every nook and cranny!
Take your glitter of choice and sprinkle the glitter over the entire shoe. Anywhere the glitter paste is, is where you should apply more loose glitter. Lightly press the glitter into the glitter paste. Place the shoes somewhere where they wont be touched and allow to dry for at least 24 hours. The longer the better! They should then look a little something like this:


Now its time to seal in all of your hard work! For this step I would highly recommend to be outside because the spray has a very strong smell. Again place newspaper underneath the shoes and spray a thin coat of Mod Podge Acrylic Gloss Sealer all over the glittery area. This will help to protect the glitter and add a beautiful shine.


Again allow the sealer to dry. I ended up waiting a couple of hours after the first coat and then applied another coat of Mod Podge, this of course is up to you. And now you have a like-new pair of shoes!


I'm so happy with the outcome and hope you found this DIY helpful and inspires you to give glittering your old shoes a try! If you have any questions, please feel free to ask!


Friday, June 15, 2012

Makeup of the Day

What's on my face today?


Products used (face): 1. Revlon Colorstay liquid foundation for Normal/Dry Skin in 150 Buff.
2. Conceal blemishes with Sonia Kashuk Hidden Agenda Concealer Palette.
3. NYX HD Photogenic Concealer under eyes.
4. E.l.f. Translucent Matifying Powder to the T-zone and chin.

For the eyes i'll be using five eyeshadows from the Urban Decay Naked 2 Palette:


Products used (Eyes):* I always start by filling in my eyebrows using the Coastal Scents Brow Tones palette, a small angled brush and NYX Eyebrow Shaper *
1. With a fluffy brush apply Tease (matte, pale brown) to the crease, this will later act as a transition color.
2. Using the flat shadow brush that came with the palette, pack YDK (shimmer, cool bronze) all over the lid. Blend a little at the crease.
3. With an angled brush, apply Busted (shimmer, deep brown)to the outer V lightly, depending on how dark you want this look gradually intensify the shadow. Blend at edges and I lightly blended the shadow to soften the brown.
4. Where Busted starts to fade towards the center of the crease, I applied Suspect (shimmer, pale gold beige) to the remaining inner half of the crease. Blend.
5. With a fluffy brush, apply Bootycall (shimmer, creamy white) to highlight the brow. Tease should help transition between the highlight and Busted/Suspect shadows.
6. Using a small angled brush apply Bootycall to the tear duct. With the same brush, apply Suspect underneath the lash line.
7. Line waterline with ULTA Kohl Eyeliner in Deep Brown.
8. Curl eyelashes and apply mascara. I used Revlon Fabulash in Blackest Black.


Products used (Cheeks): 1. I lightly contoured my cheeks using Hoola by Benefit.
2. Apply Prestige Skin Loving Minerals Bronzing Powder in Pure Shimmer to highlight the tops of the cheeks.
3. Using a Stippling brush apply a very small amount of NYX Cream Blush in Natural to cheeks. Trust me, a little goes a LONG way!


Products used (Lips): 1. Lightly dab NYX Matte Lipstick in Summer Breeze across lips.


“Anyone can love a rose, but it takes a great deal to love a leaf. It’s ordinary to love the beautiful, but it’s beautiful to love the ordinary.”
― Unknown